Why is Chrome so slow on Windows 11?

Windows 11 improves considerably on the previous iterations of Windows. However, users have come to experience slow browsing on Chrome after upgrading to Windows 11.

If you are one of those not happy with a laggy Chrome browsing experience, we have got you covered. We will share a few useful tips to fix slow browsing issues on Windows 11, in this guide.

Reasons for Chrome becoming so slow on Windows 11?

There can be a myriad number of reasons, but the most common one is not upgrading to the latest version of Chrome. Secondly, there can be cache blocking going on that can make browsing on Chrome extremely slow.

Moreover, some other programs or applications might be using too much of your PC’s resources, causing Chrome to slow down.

7 Tips to Fix Slow Chrome Browsing in Windows 11

Here are a few fixes that you can try to make your Chrome browsing experience a breeze in Windows 11.

1. Restart your computer or Chrome

The first fix is an easy one. Just restart your computer. If this doesn’t help, you can also restart your browser.

For restarting Chrome, type chrome://restart in the address bar. This will restart your browser quickly.

2. Close all unused tabs

Google Chrome is famous for using a lot of resources, especially when you open a lot of tabs. Too many tabs can eat a lot of your RAM resources because each tab opens its own process,  which can lead to your browser getting slow.

You can check how many resources your Chrome browser has through the Task Manager. Press Ctrl + Alt + Delete to open the Task Manager. Then find Chrome under the apps section and check how much resources it is consuming in the Memory section on the right.

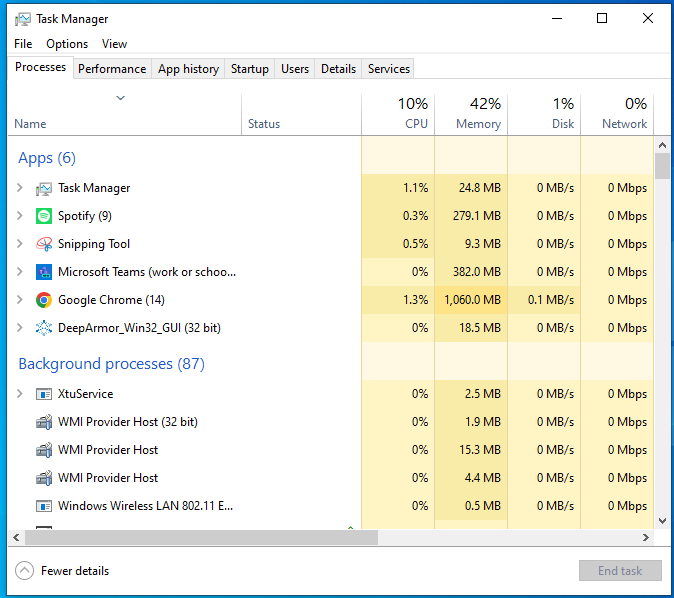
As you can see in the image, Google Chrome is using a lot of memory. Sometimes, if you have a high-end PC with sufficient RAM, then your Chrome window might not slow down. However, if you don’t have a lot of PC resources and your Chrome gets slow, then close unnecessary tabs and see if it fixes the issues.

3. Clear browsing cache and cookies

Accumulated cached data and cookies can also slow down your browser if you have been using Chrome for a long time. You can resolve this issue by clearing the browsing cache and cookies. 

  • Press Ctrl + Shift + Delete to go to the clear browsing page
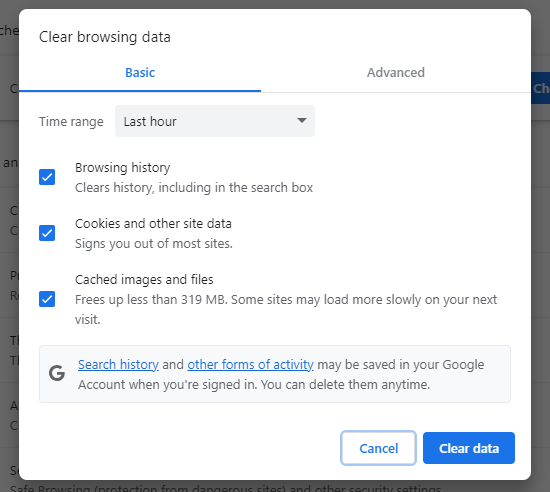
  • The next step is to check the Cache and Cookies boxes
  • Click “Clear Data” to clear the caches and cookies
4. Disable unused Chrome extensions

Your browser might be running slow because of unnecessary extensions. Some extensions can conflict with other programs, hence slowing down your browser. You can easily disable such extensions by:

  • Start by typing chrome://extensions in the address bar
  • From the Extensions page, choose an extension you want to disable. We are using Kaspersky Protection as an example.
  • Turn off the blue toggle button on the extension.
  • You can turn off as many extensions as you want. After that, check whether your Google Chrome is working normally.
5. Disable hardware acceleration

If you are still facing slow Chrome then this next tip can help you. Disabling hardware acceleration is another tip that can fix slow Chrome issues. Hardware acceleration is used to reduce the workload on the CPU by assigning computing tasks to other specialized hardware. But your browser can get slowed down because of this feature.

Here’s how you can disable it:

  • First, find the Settings option.
  • From the Settings page, navigate to the System section.
  • Find the toggle “Use hardware acceleration when available” and disable it.
  • After disabling it, restart your Chrome browser and see if it’s slow or not.
6. Update Chrome version

Another reason for your Chrome browser getting slow might be that you are running an old version of the browser that doesn’t support some plug-ins and features. Google, with the new Chromium built, releases regular monthly updates. To avoid your browser getting slow, keep it up to date.

  • Open settings and navigate to “About Chrome”
  • Check the version of your browser, and update it if necessary
  • After installing the latest version, see if your browser is working normally or not.
7. Use third-party software

If your browser is still slow, then you can always turn to third-party software to effectively allocate PC resources to Chrome. One such software is TurboCharger. TurboCharger is a Windows utility app that can supercharge your PC’s performance. With TurboCharger, you can allocate your PC’s resources to Chrome to ensure that it doesn’t slow down.

Here’s how you can use TurboCharger to boost your browser’s performance:

  • Download and install TurboCharger.
  • Once you launch the application, a menu will open up
  • If you enable the “Auto Manage” toggle in the menu, then TurboCharger will automatically assign the highest priority to apps that are in use.
  • You can assign priority manually to apps through the “Manage Apps” section. Also, you can add other apps and assign them their respective priorities.

TurboCharger

Boost productivity and system performance with TurboCharger. Organize your apps and games and simplify your workflows with TurboCharger’ automatic app prioritization

Conclusion

Chrome on Windows 11 can get slow due to a number of reasons. However, you can restart your browser to resolve simple issues. Also, for more serious issues, you can either clear your caches, disable hardware acceleration, or use third-party software, like TurboCharger, to fix this problem.

FAQs

How Can I Make Chrome Run Faster in Windows 11?

  • Close unnecessary tabs
  • Update Chrome
  • Turn off any unwanted processes
  • Configure your preload settings

How do I reduce RAM Usage in Chrome Windows 11?

To reduce RAM usage in Chrome Windows 11, follow the following steps:

  • Open Chrome and type the following into the address bar:

chrome://flags/#high-efficiency-mode-available

  • Next, type the following in the address bar:

chrome://settings/performance

  •  From the Performance menu, toggle the Memory Saver switch to enable it
  • Restart your browser for the change to take effect

How to Clean AppData Folder in Windows 11?

appdata folder windows 11

Are you experiencing a slow PC? Then this could be due to your AppData folder taking a lot of storage space on your PC. Here you can know about “appdata folder windows 11”.

So, if you don’t want to compromise on your PC’s performance, you have to clean your AppData folder. If you are looking for ways to clean your AppData folder in Windows 11 then this guide has all that you need to know about cleaning your AppData folder.

But first, let’s understand what the AppData folder is and how cleaning it can affect your computer.

What is the AppData folder?

The AppData folder is where all the app data and settings of all applications and programs are stored.  This folder can be found on the C drive in every Windows computer. C:\Users\User Name\AppData is the path of this folder.

As it is hidden by default in Windows, you first have to make the AppData folder visible. You can unhide this folder by going to View > Show and select Hidden items on Windows 11. This will make the Windows show all the hidden files and folders.

Why does the AppData folder take up a lot of space on your computer?

When you use your PC for a long time, the AppData folder can take a lot of GBs on your C drive. If there are too many files in C drive, then it can slow down your system and cause performance issues.

However, it is not safe to jump the gun and delete all the files in the AppData manually as it can cause serious performance issues. The files in the AppData folder are important for the apps that are installed on your PC. If you delete these files then your apps might not work properly, and you will also lose user information and all other saved data.

How to delete the AppData Folder in Windows 11?

Here are 3 ways you can delete temporary files from the AppData folders in Windows 11.

1. Manually delete the files

You can manually delete temporary files in the AppData folder. Temporary files of the app are saved in a folder called Temp. Here’s how you can delete these files:

  • Open Run by pressing Win + R
  • In the Run dialogue, type %LocalAppData%\Temp and press Enter. With this, you can navigate to the Temp folder in the AppData folder. There you will find some temporary files which are safe to delete
  • Press Ctrl + A to select all temporary files. Then delete the files by pressing the delete button or by right-clicking on the selected files and selecting the delete option
  • If you want to permanently delete the temporary files press Shift after right-clicking and selecting all the files, and then click on the Delete option. After you do it, a pop-up will appear saying “Are you sure you want to permanently delete these XYZ items.” Click Yes to complete the process
  • To permanently delete these files from the Recycle Bin, just right-click on it and click on “Empty Recycle Bin”.

2. Through the settings app

Windows 11 has some built-in features for users to delete temporary files in the AppData folders. Storage is a feature in the settings app that lets you safely delete temporary files.

  • Press Win + I to open the settings apps
  • Navigate to System > Storage 
  • Click on Temporary files
  • You have to make sure that the Temporary Files option is selected. Click on the Remove Files button. This will clean up the temporary files in the AppData folder. 

3. Use the Disk Cleanup feature

Disk Cleanup is another built-in Windows feature that can help you to remove temporary files from your computer. Here’s how you can use this tool:

  • Into the search box, Type cleanup and select Disk cleanup from the result to open this tool
  • Select drive C and click OK to start the scan for junk and temporary files
  • In the Disk cleanup interface, select Temporary files to remove them. Moreover, you can also select junk files to delete.
  • After the process ends, click OK.

It doesn’t matter what way you use to clear your AppData folder, you will find more space in your C drive after you are done.

Why should you clean your AppData folder?

Cleaning your AppData folder can help you improve your PC’s performance. Temporary files can cause your PC to slow down, or at least, to lag. But deleting the contents manually can also affect the performance of your apps. 

If you don’t want to delete AppData folders, but don’t want to compromise on your PC’s performance, then you can use TurboCharger.

TurboCharger is a top-tier windows utility app that allows you to allocate your PC’s resources effectively so that you get optimal performance from your PC.

Simply just download and install TurboCharger, launch it, and the app will automatically assign priority to the apps and games you use the most. If you want to personalize your app prioritization, then you can do that as well with TurboCharger.

TurboCharger

Boost productivity and system performance with TurboCharger. Organize your apps and games and simplify your workflows with TurboCharger’ automatic app prioritization

Conclusion

Given how many apps we use these days on our PC, it shouldn’t come as a surprise when our PCs become slower. However, you can clean your AppData folder to improve your PC’s performance with all the ways listed in this guide.

10+ Tips to Improve Your PCs Performance in Windows 11

Our computers play an increasingly pivotal role in our daily lives. Whether we’re tackling work tasks, engaging in creative pursuits, or unwinding with our favorite games, the performance of our PCs can make or break the experience. Microsoft has ushered in a new age of computing with Windows 11, promising improved productivity, design, and seamless cross-device integration. 

However, if you want more juice out of Windows 11 fast then we can help you.  In this blog, we’ll delve into a comprehensive array of strategies designed to maximize the performance of your Windows 11 PC. 

Tips to Improving PC Performance in Windows 11

Improving PC performance in Windows 11 fast can be achieved through a combination of system settings adjustments, software management, and hardware optimization. Here are some tips to help enhance your PC’s performance: 

System Settings Adjustments

  1. Update Windows and Drivers

Ensure Windows 11 is up to date by checking for updates in the Settings app. Update your device drivers, especially graphics, audio, and network drivers, through Device Manager or the manufacturer’s website.

  1. Adjust Power Settings

For optimal performance, choose “High Performance” or “Balanced” for your power plan.  

  • Navigate to Power & Battery > Power mode under Settings > System. 
  1. Manage Startup Programs

Disable unnecessary startup programs to speed up boot time. 

  • Open Task Manager (Ctrl + Shift + Esc) > Startup tab and disable unwanted programs. 
  1. Optimize Visual Effects

Reduce visual effects for better performance. 

  • Go to Settings > System > About > Advanced system settings > Performance Settings and select “Adjust for best performance” or customize which effects to disable. 
  1. Disk Cleanup and Defragmentation

To get rid of system cache and temporary files, use Disk Cleanup. Here’s how to do it: 

  • Go to Settings > System > Storage > Cleanup recommendations. 
  • For HDDs, use the defragmentation tool (Defragment and Optimize Drives). 

Software Management

  1. Uninstall Unnecessary Software

Remove bloatware and unused programs to free up resources. 

Go to Settings > Apps > Apps & features and uninstall unwanted applications. 

  1. Use Lightweight Software 

Use software that is less resource-intensive for your everyday tasks. 

  1. Manage Background Processes 

Disable or limit background processes and apps. Here’s how: 

Go to Settings > Apps > Apps & features, select the app, and configure its background activity. 

Hardware Optimization

  1. Upgrade RAM 

Adding more RAM can significantly boost performance, especially for multitasking and memory-intensive applications. 

  1. Switch to an SSD 

An SSD may significantly speed up boot times and general system responsiveness if you’re still using an HDD.  

  1. Check for Overheating 

Make sure your computer is not overheated and has adequate ventilation because too much heat might stifle performance. Clean dust from vents and consider using a cooling pad for laptops. 

  1. Optimize Graphics Settings 

To strike a balance between performance and visual quality, adjust the in-game visuals. To adjust performance parameters, use your GPU’s control panel (NVIDIA Control Panel or AMD Radeon parameters). 

  1. Virtual Memory (Paging File) 

Adjust the size of the virtual memory (paging file) for better performance. 

Go to Settings > System > About > Advanced system settings > Performance Settings > Advanced tab > Virtual memory. 

  1. Disable Search Indexing 

If you rarely use Windows search, disabling indexing can improve performance. 

Open Services (type services.msc in the Run dialog), find “Windows Search,” and set it to “Manual” or “Disabled.” 

  1. Use Performance Monitoring Tools 

Use built-in tools like Task Manager or third-party tools to monitor and manage system resources effectively. 

  1. Keep Your System Secure 

Regularly scan for malware and viruses using Windows Defender or other reputable antivirus software, as infections can severely impact performance. 

However, if you don’t want the hassle of applying these tips, then you can use TurboCharger to improve your PCs performance in Windows 11 fast. TurboCharger is a top-tier windows utility app that users can use to prioritize their apps and programs and improve their computer’s performance.

TurboCharger

Boost productivity and system performance with TurboCharger. Organize your apps and games and simplify your workflows with TurboCharger’ automatic app prioritization

Final Word 

Optimizing the performance of your Windows 11 PC is not merely about enhancing speed; it’s about cultivating a smoother, more efficient computing experience. By implementing the strategies outlined in this guide, from adjusting system settings to managing software and hardware, you can breathe new life into your device.  

Whether you’re aiming to boost productivity, enhance gaming experiences, or simply streamline everyday tasks, these tips offer a roadmap to success. On Windows 11, though, you may also utilize TurboCharger to enhance PC performance.